Volumetric Clouds Write-up(翻译)
Table of Contents
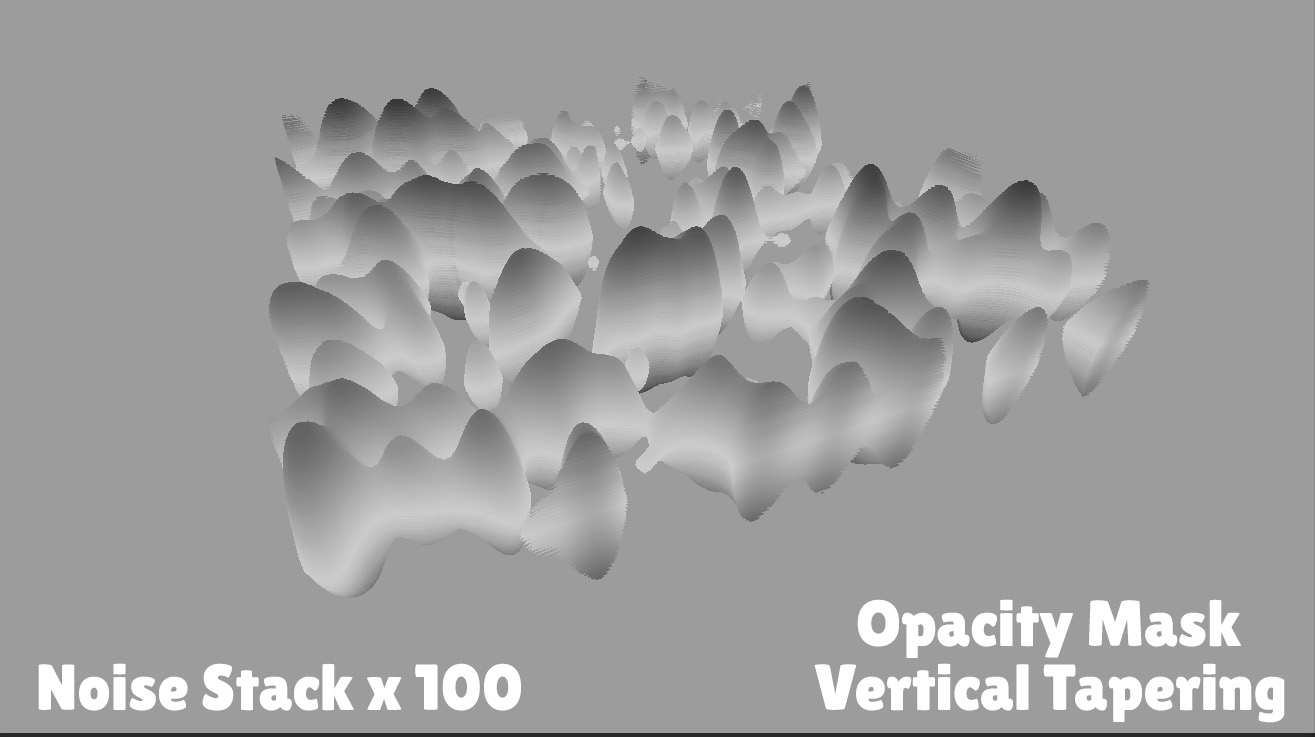
The basis of this effect is drawing a vertical stack of quads, each one showing a slice of the cloud. The cloud texture itself is just a world-mapped, top-down animated noise that is piped into opacity.
这种效果的基础是绘制一组垂直堆叠的四边形(简称为:四边形堆栈,vertical stack of quads),每个四边形都显示一片云。 云纹理本身只是一个世界映射的(world-mapped)、自上而下的(top-down)的动画噪声,它通过渲染,管道传输到不透明度中。

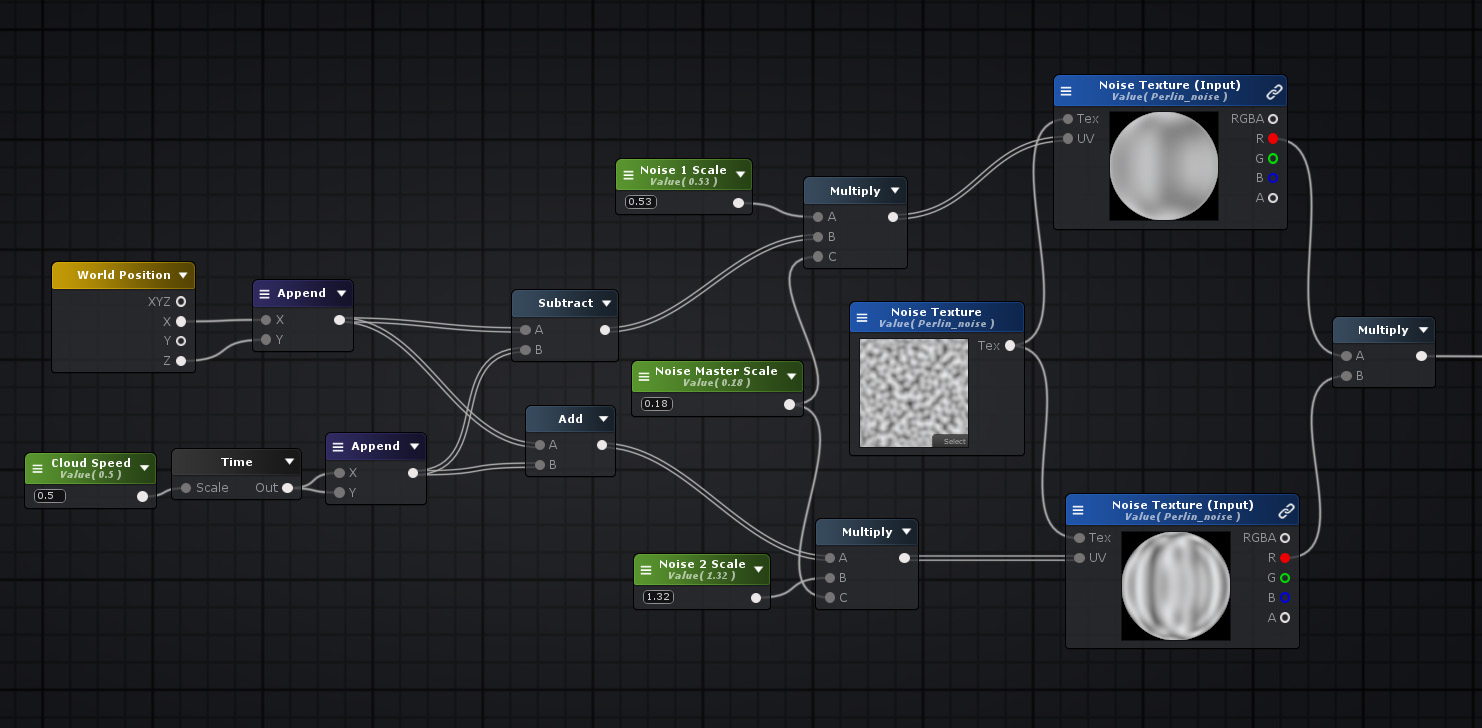
To animate the noise, I use the same trick that I use in countless other shaders to create a natural looking motion that appears free of obvious repetition, which is to blend the noise with either a copy of itself with a different UV scale, or a different noise texture, and pan these two noise textures against each other in opposite directions, and then blend them together through multiplication or some other desired blend mode.
为了使噪波动画化,我使用在无数其他着色器中相同的技巧来创建,使之看起来没有明显重复的自然运动,即将第一个噪声纹理,与具有不同 UV 值的同一纹理,或另一个不同的噪声纹理,并将这两个噪声纹理,在相反的方向上相互平移(pan),然后通过乘法或其他一些所需的混合模式,将它们混合在一起。
This animated noise is useful is so many shader effects. For example, it’s the basis of a nice fire effect, where instead of panning the two noise textures in opposite directions, you pan them both upwards but at different speeds and scales.
这种动画噪声非常有用,因为它是很多着色器效果的实现基础。 例如,它是实现一个漂亮的火焰效果的基础,只是和云不同,它不是在相反的方向平移两个噪波纹理,而是向上以不同的速度和比例平移它们。

To pan a texture, you simple add Time to the UV coordinates in whichever axis you wish to pan. You just have to make sure you use a texture that is set to repeat wrapping and not clamped, and also one that tiles seamlessly with itself.
要平移纹理,您只需利用shader的时间变量,添加到您希望平移的任何轴的 UV 坐标中。 但要确保纹理模式为重复包装(repeat wrapping)而不是夹持(clamped),以及与自身无缝拼接(tiles seamlessly)的纹理。
Remapping this noise texture, and then raising it to a power, will give you control over the opacity cut-off and also the softness of the noise.
重新映射此噪波纹理,然后将用幂运算将其值提高,您可以控制不透明度的裁剪值(opacity cut-off)以及噪波的柔和度。
The quad stack itself can be modelled in advance, or generated at runtime with this script, via Graphics.DrawMesh().
四边形堆栈本身可以预先建模,或者在运行时使用脚本通过
Graphics.DrawMesh()生成。
Generating it via script allows you to adjust the amount of layers for performance reasons, however it won’t allow you to view the effect in Edit Mode, and I believe that it may not be appropriate for VR due to rendering only in one camera.
通过脚本生成,它可以让您出于性能原因调整层数,但是它不允许您在编辑模式下查看效果,而且我认为它可能不适合 VR,因为它只在一台相机上渲染。
To make complete the 3 dimensional shape of the clouds, round them off towards the top and bottom of the quad stack by darkening the noise the further away it is from the middle of the stack.
为了完成云的三维形状,将它们向四边形堆栈的顶部四边形和底部四边形进行四舍五入,方法是在离堆栈中间越远的地方,使噪声变得越暗。
To darken the opacity map further away from the middle of the quad stack, you can either bake in vertex colours and multiply by that, or calculate the y offset in shader.
要使远离四边形堆栈中间的不透明度贴图变暗,您可以烘焙顶点颜色并乘以该颜色,或者在着色器中计算 y 偏移。
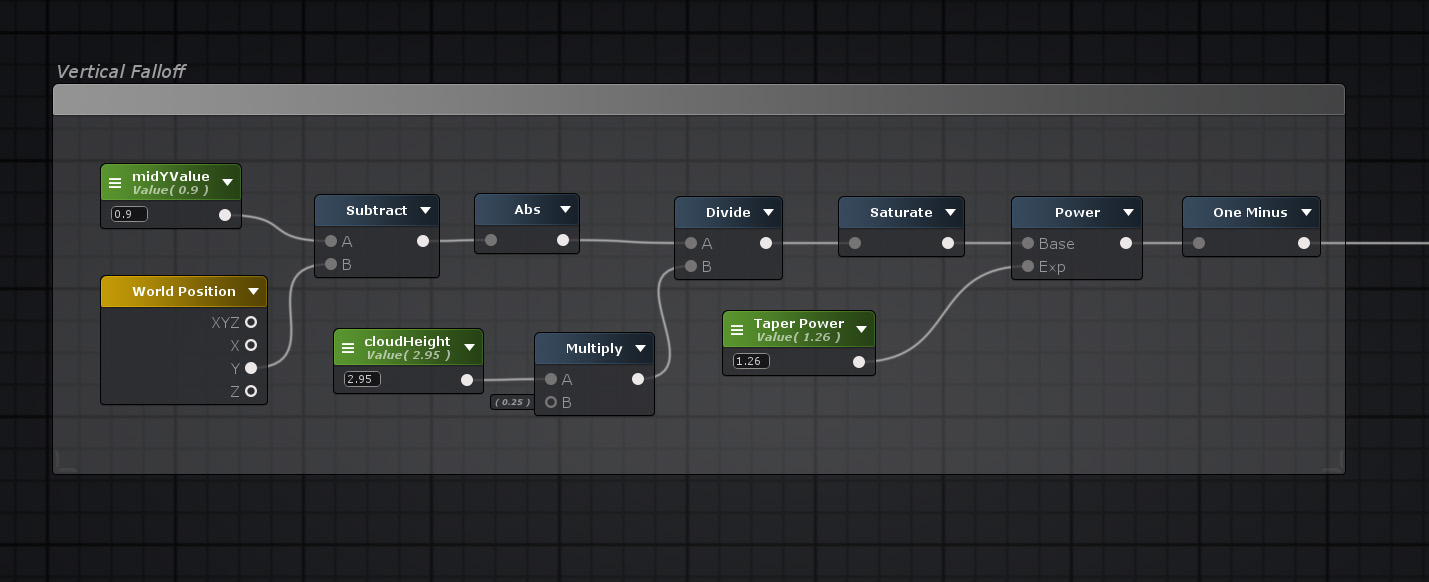

This vertical falloff is also going to come in handy to give the clouds some basic ambient lighting, darkening them on the bottom and keeping them lighter on top. You can use this gradient to add in both the Ambient Sky Colour and Ambient Ground Colour, or set those colours yourself in shader. In real life, low clouds will often subtly pick up the colour of the ground on their bottom surface.
这种垂直衰减(vertical falloff)也将派上用场,为云层提供一些基本的环境照明,使底部变暗并保持顶部较亮。 您可以使用此渐变添加环境天空颜色和环境地面颜色,或在着色器中自行设置这些颜色。 在现实生活中,低矮的云层通常会巧妙地吸收其底部表面的地面颜色。
A subsurface scattering lighting pass is also a nice addition to the shader – since clouds let quite a lot of light through, when the sun is directly behind them you can often see it glowing through. The same Dot Product of the View Direction and negated Light Direction can be used here.
次表面散射(subsurface scattering )光照也是着色器的一个很好的补充——因为云让大量的光通过,当太阳直接在它们后面时,你经常可以看到它发光。 此处可以使用视图方向和主平行光的反方向的点积。
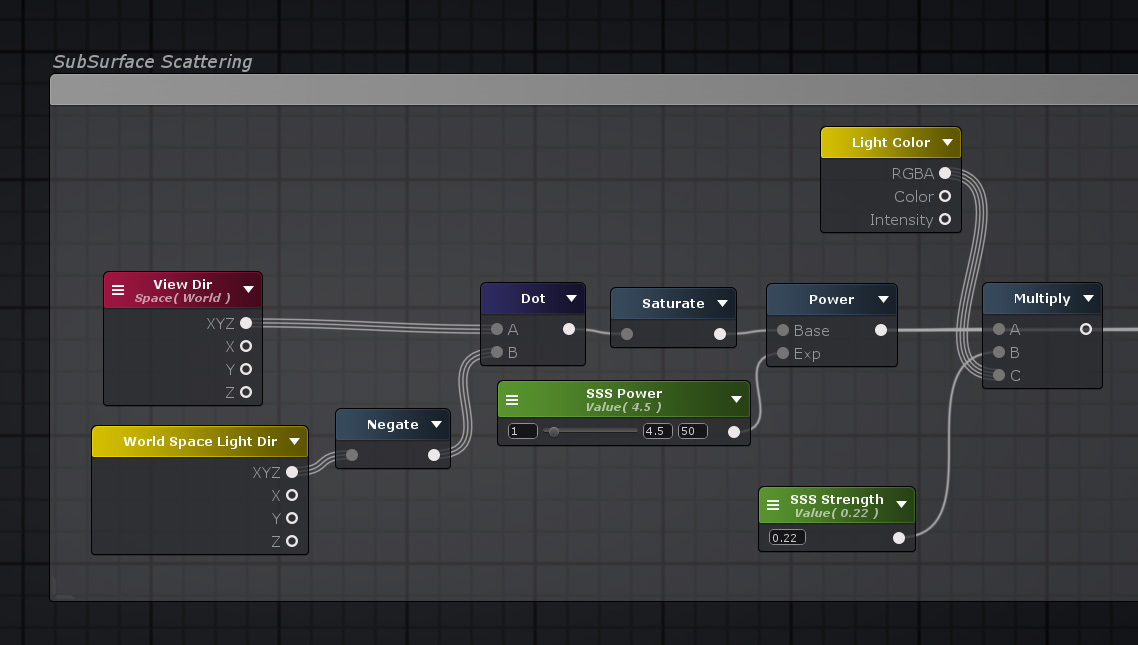
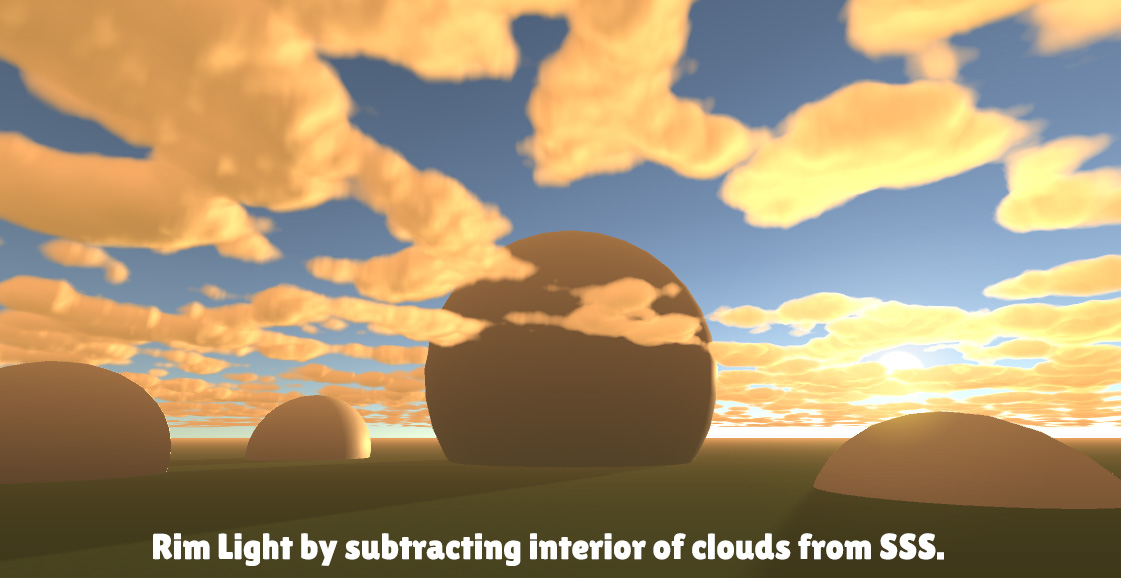
There’s a lot of interesting tweaks you can make to the subsurface scattering contribution to create some nice effects. For example, if you constrict the final tapered noise slightly, and then subtract it from the SSS mask, it will only allow the light through around the outside of each cloud, and can create a pleasing rim-light effect.
您可以对次表面散射贡献进行许多有趣的调整,以创建一些不错的效果。 例如,如果你稍微压缩最终的锥形噪点(tapered noise),然后从 SSS 蒙版(SSS mask)中减去它,它只会让光线穿过每个云的外部,并且可以创建令人愉悦的边缘光效果。
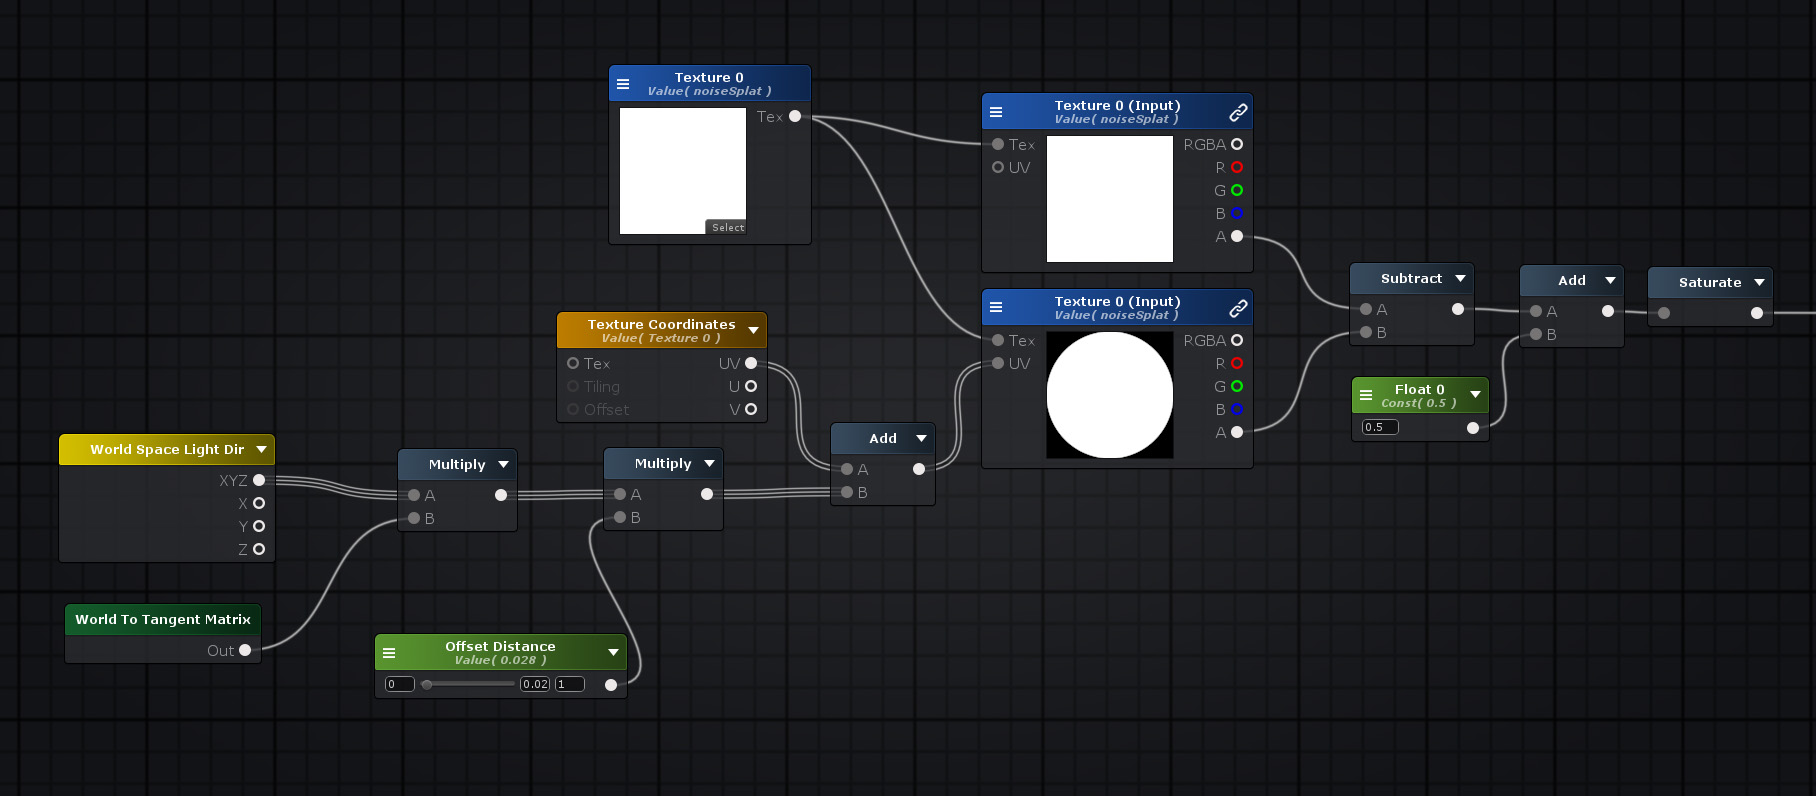
Adding in directional light is a bit tricky, since these clouds are just 2d textures and don’t have normals that are usually required for calculating light. The best way that I’ve found is to create a duplicate of the cloud noise, and offsetting it in the direction of the light, and then subtracting that offset noise from the original noise. This will leave a soft rim of noise facing towards the light direction, which we can use as a directional lighting mask.
添加方向光有点棘手,因为这些云只是 2d 纹理,没有计算光照通常需要的法线。 我发现的最佳方法是创建云噪声的副本,并在光的方向上偏移它,然后从原始噪声中减去该偏移噪声。 这将留下一个朝向光线方向的柔和噪点边缘,我们可以将其用作定向照明蒙版。

To offset the noise texture, you need to transform the Light Direction into tangent space – this will give you a light direction vector that appropriately offsets the UVs of the texture. You may have to negate either the x or y axis, or both, depending on the orientation of the mesh. Offset this noise by an adjustable amount to get the best lighting effect, which will depend on the scale and detail of the noise texture.
为了抵消噪声纹理,您需要将光照方向转换为切线空间——这将为您提供一个适当偏移纹理 UV 的光照方向向量。 您可能必须否定 x 轴或 y 轴,或两者都取反,具体取决于网格的方向。 以可调节的量偏移此噪波以获得最佳照明效果,这将取决于噪波纹理的比例和细节。
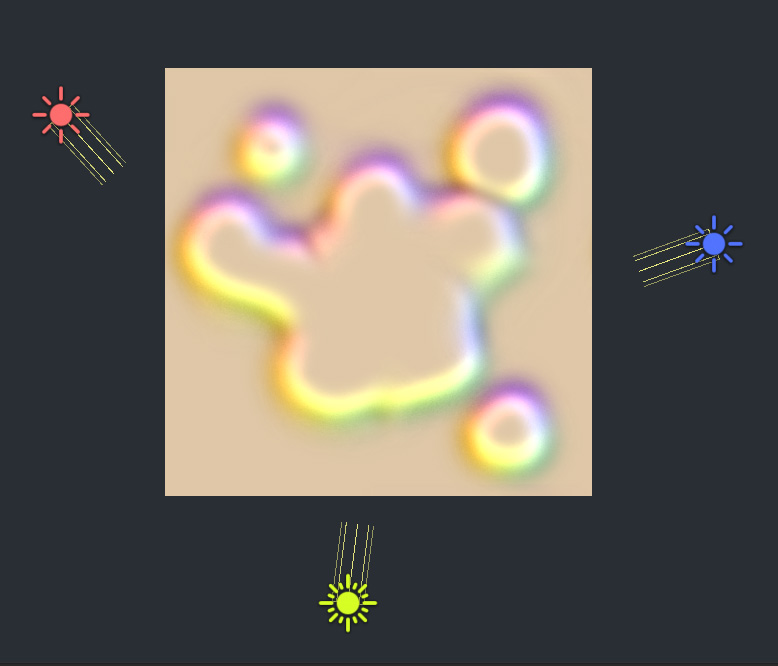
You can use the fake lighting UV-offset (by tangent space light direction) trick with multiple lights. Multiply by Light Colour and Attenuation at the end, and pipe into a Custom Lighting input. It’s a good way to fake lighting on smoke particles and other greyscale textures, especially if they’re animated (via a flipbook, UV distortion, or noise overlays).
您可以对多个灯光使用假照明 UV 偏移(通过切线空间光方向)技巧。 最后乘以 Light Color 和 Attenuation,并通过管道输入自定义照明输入。 这是在烟雾粒子和其他灰度纹理上伪造照明的好方法,特别是如果它们是动画的(通过翻书、UV 失真或噪声叠加)。
Depending on your game lighting and performance concerns, it’s possible to not calculate directional lighting at all, and still get very convincing clouds with just an Ambient and SSS contribution. The SSS in particular gives a pseudo-directional look to the lighting anyway.
根据您的游戏光照和性能问题,有可能根本不计算定向光照,而仅使用 Ambient 和 SSS 贡献仍然可以获得非常令人信服的云。 无论如何,SSS 尤其为照明提供了伪定向外观。
These clouds also can cast nice shadows on the underlying terrain, and with a volumetric lighting asset, can create very pretty sun rays. I’m a big fan of HX Volumetric Lighting, but there are also several free Volumetric Light assets available that are also very good.
这些云还可以在底层地形上投射出漂亮的阴影,并且使用体积光资产,可以创建非常漂亮的太阳光线。 我是 HX Volumetric Lighting 的忠实粉丝,但也有一些免费的 Volumetric Light 资源可用,它们也非常好。
Finally, I like to use a Time-of-Day script to rotate the main direction Sun light over time, and also set the light, ambient and fog colours by a sampled gradient.
最后,我喜欢使用 Time-of-Day 脚本随时间旋转主方向太阳光,并通过采样渐变设置光、环境和雾的颜色。
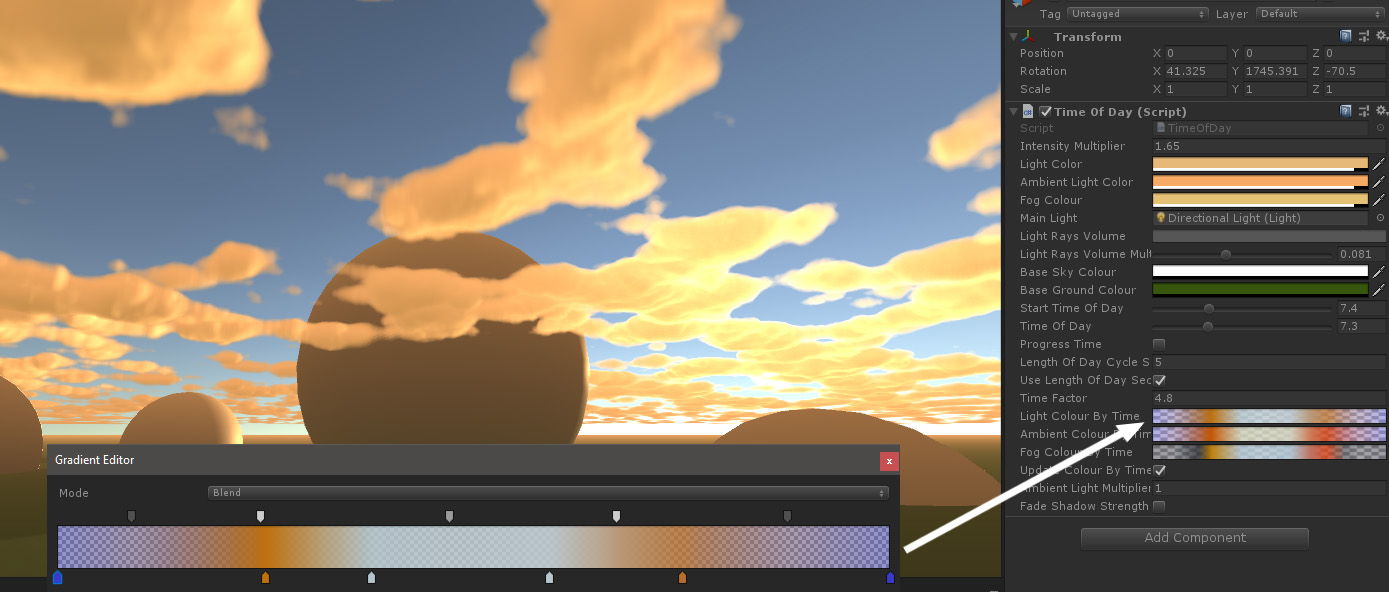
You can set an adjustable gradient in the inspector with:
可以通过在inspector面板中设置一个可调整的渐变颜色来达到光,环境,雾的颜色变化
public Gradient lightColourByTime;

[Range(0f, 1f)]
public float timeOfDay
and sample it with
通过以下代码进行采样操作
Color lightColor = lightColourByTime.Evaluate(timeOfDay);
And set it to your light colour. You can do the same to your ambient colours via
除了自定义相关的天空环境光,地面环境光和雾颜色之外,可以直接使用RenderSettings中的对应选项:
RenderSettings.ambientSkyColor
RenderSettings.ambientGroundColor
RenderSettings.fogColor
If you’ve set your cloud shader up to use the Light Colour, and/or the global Ambient and Fog colours, you can get some very nice saturated sunrises and sunsets, and then fade to darker blues at night, depending on the art style of your game of course.
如果您已将云着色器设置为使用 Light Colour 和/或全局 Ambient 和 Fog 颜色,您可以获得一些非常漂亮的饱和日出和日落,然后在晚上淡入深蓝色,具体取决于艺术风格 当然是你的游戏。
I hope you’ve gotten something out of the creation of these volumetric clouds. As always, if you have any questions, leave them in the comments, or hit me up on discord or twitter!
我希望你已经从这些体积云的创建中得到了一些东西。 与往常一样,如果您有任何问题,请在评论中留言,或者在 discord 或 Twitter 上联系我